new and used avionics
 Sell Your Avionics Here
|
Avionics List
new and used avionics |
Sell Your Avionics Here
|
Buying Safety Tips |
Avionics Articles and Reviews
|
Before we dive into the new MX20, let's
briefly go over just what a "Multi-Function Display" is. Even though
it's not in writing, the avionics gods consider any display that is capable of
displaying two or more different pieces of information "Multi-Function". No
doubt the MX20 falls under this definition but other units prior have met this
criteria. How about the Argus 5000/7000, Garmin 400 series GPS/MAPs and the
Sandel EHSI? One would have to consider these true Multi-Function devices also
if they have the proper inputs. So what makes the MX20 stand out? Well, it's
bigger than a bread box, has color that just jumps out at you and the maps look
like real charts without creases in them, especially the IFR map.
NOTE: None of the "Thumb Nail" pics are more than 65 seconds.
Sorry if the images are up to par. I found it very difficult to take a
picture of a MFD but did the best I could.
UPS Aviation Technologies MX20 measures 6.250" wide, 5.0" tall and
9.632" deep including the rack. The diagonal size of the screen is a
whopping 6". If you can't read this display you've got some serious sight
problems. Screen resolution is 640X480 (921,600 RGB Dots) Viewing angles are
excellent. Left or right view angle is 50 degrees, up is 20 degrees and down is
30 degrees. This viewing angle is great for most aircraft with center stack
radios but I wouldn't recommend sticking the MX20 in the far right radio stack
of a Bonanza. The viewing angle would be marginal. Also, you need the MX20
within reach because you will be doing some button pushing. I refuse to keep
typing UPS Aviation Technologies; it's way too long. From this point on, we will
call them IIMorrow.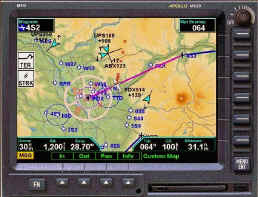 I often write them a check so I'll call them whatever I desire.
I've never understood why they changed their name to the longest manufacturing
name in aviation. IIMorrow kept the MX20 on a diet; it weighs only 4.65lbs with
the rack. I've eaten hamburgers that weighed more than the MX20. Installation of
the MX20 is straightforward if you have room in the panel. No external cooling
is required. In fact, this unit has a heater that turns on if the temperature
gets below 10C. My guess the heater is for the display. There're vent holes in
the back of the unit where a fan could go but again, it's not needed. Only about
10% of the area inside the MX20 is used. The motherboard appears to have several
connectors on board and I'll bet IIMorrow has plans for other devices to be
inside of this box in the future. Only one connector is used on the back of the
MX20 but there's space and cut outs for a total of four, plus room for an RF
connector. The instruction manual is excellent which is typical for IIMorrow.
The installation manual shows what tools you will need, plenty of pictures and
easy to read wiring diagrams. Barring panel space, this is probably the simplest
piece of avionics to install in the aircraft. Operating voltage is 10-40Vdc.
Nothing could be easier to wire. With as little as six wires, the MX20 is up and
running. The MX20 is a VFR box that is designed to supply the pilot with
supplemental information, and it does, with lots of it.
I often write them a check so I'll call them whatever I desire.
I've never understood why they changed their name to the longest manufacturing
name in aviation. IIMorrow kept the MX20 on a diet; it weighs only 4.65lbs with
the rack. I've eaten hamburgers that weighed more than the MX20. Installation of
the MX20 is straightforward if you have room in the panel. No external cooling
is required. In fact, this unit has a heater that turns on if the temperature
gets below 10C. My guess the heater is for the display. There're vent holes in
the back of the unit where a fan could go but again, it's not needed. Only about
10% of the area inside the MX20 is used. The motherboard appears to have several
connectors on board and I'll bet IIMorrow has plans for other devices to be
inside of this box in the future. Only one connector is used on the back of the
MX20 but there's space and cut outs for a total of four, plus room for an RF
connector. The instruction manual is excellent which is typical for IIMorrow.
The installation manual shows what tools you will need, plenty of pictures and
easy to read wiring diagrams. Barring panel space, this is probably the simplest
piece of avionics to install in the aircraft. Operating voltage is 10-40Vdc.
Nothing could be easier to wire. With as little as six wires, the MX20 is up and
running. The MX20 is a VFR box that is designed to supply the pilot with
supplemental information, and it does, with lots of it.
The setup mode inside the MX20 is a no-brainer. The installation manual along with the menu driven display makes setting this MFD with relationship to your aircraft easy. Set up should only take about 15 minutes. The database card is located in the lower right front of the MX20. To remove the data card, simply push the button located on the side of the data card and out it pops, well sort of. On my unit, the card didn't pop out enough to grab with my fingers. I had to use needle nose pliers along with a few choice words in order to get the card out. The data card can be updated every 28 days if desired. It was easy to install the card, just push it in. The MX20 must have a GPS input source for navigation such as any of IIMorrow's GPS's, Garmin 250Xl, King KLN 90B and many others. Be SURE to verify your present GPS will work with this new MFD before installing it or you may learn to hate yourself. This also goes with the encoder interface. We've found that often RS-232 doesn't work the same with all manufacturers. We recently found the RS-232 output from a IIMorrow SL 70 transponder would not work with the Garmin GNC 300XL. Be sure to consult your avionics professional before mixing different manufacturers.
Now what does the MX20 really do and how does it work? First
let me say, the hardest part about writing this "Review" is getting my focus off
the amazing display on the MX20. The display is so good that I enjoy just
setting the MX20 in the "Demo" mode and watching the ground underneath the
aircraft change. Of course in the "Demo" mode, an occasional lightning strike
shows up (from the simulated WX-500) and a "Terrain" warning. The MX20 has a map
for everyone. Want to look at the IFR map? 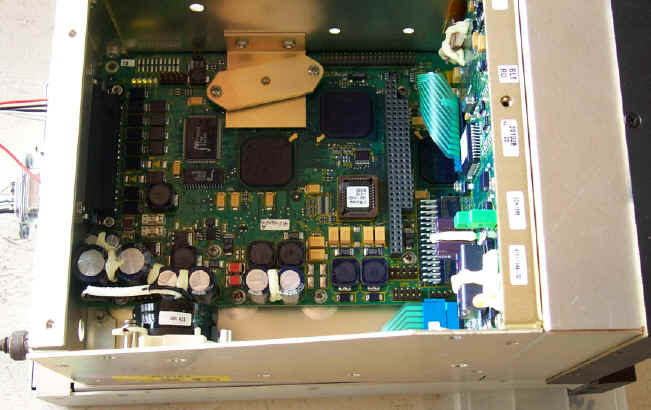 Simply press "FN" and IFR. Now the display will look just like your
Jepps chart. Press the "VFR" "Smart" key and now the display looks like a VFR
chart. What, you don't like either? Well, just create your own custom map within
the MX20. The MX20 truly has a map for every pilot. Both text and graphics are
easy to read on the MX20. The pilot can zoom the screen from .25 miles all the
way out to 250 miles. I found the 5-30 mile range worked best for me. Advisory
flags will flash for 10 seconds, then will turn solid on the screen if they are
still valid. The advisory flags are yellow with black text. The (TRAF) Traffic
advisory flag will appear on the left side of the display when traffic is
reported to be within 2,000 ft. of your altitude and within 5 miles of your
location. This feature is only available when the ADS-B system is installed ( to
be out in the future at massive dollars). The lightning advisory flag (LT) will
display on the left side of the screen when the MX20 thinks your WX500 has
rolled over and died. Of course in real life, you would need the WX500 in order
to have lightning strikes to show up on the screen. The MX20 will display
(Terrain) on the screen if the terrain surface altitude is within 500 feet of
your altitude and within two minutes of flight in any direction. You will need
digital altitude plugged into the MX20 from a source such as IIMorrow's SL 70
transponder. This is a feature this is relatively simple and cheap to connect to
the MX20 so be sure to do it. Another flag that may show up on the MX20's screen
is the (POS). If the MX20 isn't receiving valid data from the GPS, this warning
will be displayed on the left side of the screen. If you don't have a waypoint
or flight plan in your GPS, the MX20 will tell you so by displaying (RTE) in the
left of the screen. I almost forgot there is a (DEMO) warning that always shows
on the screen whenever you are in the DEMO mode. The (MESSAGE) flag will appear
at the bottom left of the screen anytime a new message is posted. The same
switch that controls the on/off function controls back lighting. When this knob
is pressed in, dimming is done automatically and adjusts to darkness. Let's say
you don't like the automatic lighting level. No problem, simply pull out the
on/off knob and set it to your own fancy. The display is exceptionally bright.
If you can't see this MFD, then I'd suggest you order IIMorrow's "Brail" model.
The display is bright and nothing less than fantastic.
Simply press "FN" and IFR. Now the display will look just like your
Jepps chart. Press the "VFR" "Smart" key and now the display looks like a VFR
chart. What, you don't like either? Well, just create your own custom map within
the MX20. The MX20 truly has a map for every pilot. Both text and graphics are
easy to read on the MX20. The pilot can zoom the screen from .25 miles all the
way out to 250 miles. I found the 5-30 mile range worked best for me. Advisory
flags will flash for 10 seconds, then will turn solid on the screen if they are
still valid. The advisory flags are yellow with black text. The (TRAF) Traffic
advisory flag will appear on the left side of the display when traffic is
reported to be within 2,000 ft. of your altitude and within 5 miles of your
location. This feature is only available when the ADS-B system is installed ( to
be out in the future at massive dollars). The lightning advisory flag (LT) will
display on the left side of the screen when the MX20 thinks your WX500 has
rolled over and died. Of course in real life, you would need the WX500 in order
to have lightning strikes to show up on the screen. The MX20 will display
(Terrain) on the screen if the terrain surface altitude is within 500 feet of
your altitude and within two minutes of flight in any direction. You will need
digital altitude plugged into the MX20 from a source such as IIMorrow's SL 70
transponder. This is a feature this is relatively simple and cheap to connect to
the MX20 so be sure to do it. Another flag that may show up on the MX20's screen
is the (POS). If the MX20 isn't receiving valid data from the GPS, this warning
will be displayed on the left side of the screen. If you don't have a waypoint
or flight plan in your GPS, the MX20 will tell you so by displaying (RTE) in the
left of the screen. I almost forgot there is a (DEMO) warning that always shows
on the screen whenever you are in the DEMO mode. The (MESSAGE) flag will appear
at the bottom left of the screen anytime a new message is posted. The same
switch that controls the on/off function controls back lighting. When this knob
is pressed in, dimming is done automatically and adjusts to darkness. Let's say
you don't like the automatic lighting level. No problem, simply pull out the
on/off knob and set it to your own fancy. The display is exceptionally bright.
If you can't see this MFD, then I'd suggest you order IIMorrow's "Brail" model.
The display is bright and nothing less than fantastic.
A "BARO" input is required on boot up of the MX20. Once the MX20 boots up and you press any key, it will ask for an altimeter setting. It remembers and displays the last setting you set in the window. From here you can press "OK" or push the Baro up or down key to set the proper altimeter setting. The MX20 will ask you every 30 minutes to verify the correct setting. At that point either press "OK" or change the setting. Remember, altitude going to the transponder and MX20 are from the encoder, which is based off pressure altitude (29.92") only. That's why you must crank in an altimeter setting. Without a proper altimeter setting your Terrain warning would not be correct. The "BARO" window popping up every 30 minutes was not a problem during my evaluation.
The (FN) key, located at the bottom left of the MX20, is one you will use often. This key is used to view different functions of the unit. Such as which map to display, what will be displayed on the screen, flight plans and much more. All the functions are shown as "Smart" keys on the display directly above the mechanical pushbutton. If you are familiar with IIMorrow's GX series GPS's then you'll appreciate just how easy the "Smart" keys are to operate. Take a look at the table and see all the available features using the "Smart" keys. No deep, hidden sub-menu's to deal with on the MX20. Everything you could possibly pine for is only a couple button pushes away. Some MFD's have you to hold this button, press two others, not this unit. Operation is very intuitive. I figured out every function on the MX20 within an hour without ever opening the manual. (Speaking of the manual, it's well written, full of pictures and in "plane English").
Detailed Features
The custom map function provides a graphic display of the map features in
relation to the aircraft location to aid in getting a better of your situational
awareness. The custom map function will selectively "overlay" all available
types of information onto a single display. This is a very easy feature to use.
Simply press the "Menu/Enter" key and a list of options will display on the
right side of the screen. At this point, press the option you desire, such as
inverting the colors on the map or changing from "Track Up" to "Desired Track
Up".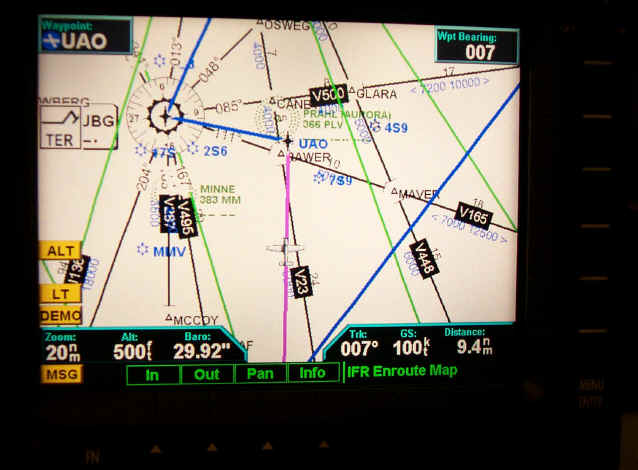 By the way, while we are in this section, press the "Menu/Enter"
key. Now press the second key down on the right until it displays "Trk UP 360"
is displayed. Notice that nice compass on the moving map. By pressing the keys
on the right you can add and delete items from the map, thus customizing it as
you desire. Once done fiddling around with the map setup, simply press the
"Menu/Enter" key and the option keys will disappear from the screen or the keys
will disappear anyway in about 30 seconds if not used.
By the way, while we are in this section, press the "Menu/Enter"
key. Now press the second key down on the right until it displays "Trk UP 360"
is displayed. Notice that nice compass on the moving map. By pressing the keys
on the right you can add and delete items from the map, thus customizing it as
you desire. Once done fiddling around with the map setup, simply press the
"Menu/Enter" key and the option keys will disappear from the screen or the keys
will disappear anyway in about 30 seconds if not used.
Map Scaling is operated by pressing the (IN/OUT) Smart keys. One can zoom from .25nm to 250nm. The scale is displayed in the lower left corner of the screen along with map orientation if selected. Even with the MX20's monster size screen, 30-50 miles is about all you need to zoom out unless you turn off some of the options. You can easily view areas you are not at via "Panning", more on this feature later.
It's hardly worth mentioning but the MX20 does have a message log page. Messages will be logged if there's something wrong with the MX20 or one of the input sensors. The (MSG) flag while any messages are in the message log. New messages not viewed will be highlighted as bold text. To get to the message log, press "FN" until the "MSG" Smart key comes up. Now press the "MSG" button and there you have it. This is an OK feature, but nothing to get excited about.
One can get to the "INFO" page easily. All you have to do is press the "INFO" Smart key. No sub-routines or fancy hold this while pressing that with this unit. The "INFO" page will show information about your present waypoint. The display will show all the airport data about the waypoint including altitude, frequencies and a nice display of the airport, showing the runways. Runway diagrams will be displayed in North Up, Track Up, or Desired Track Up, depending on which way you have the unit configured. The "INFO" does not specify if the airport has fuel or not. I found the runway layout to be very helpful in figuring out the orientation of the runway I wanted before my arrival.
The "PAN" function is about the only weak link in the MX20. The "PAN" function allows the pilot to move the display around to see beyond what is on the screen. The "PAN" function key is one of the "Smart" keys of course. When in the "PAN" function, four arrows will show up on the right side of the screen, up, down, left, right. By pressing either of these arrow buttons, you can move the cursor in any direction to see what is in the area. I found the buttons were crude to operate. Also I thought if I moved the "PAN" over a fix, i.e. ( airport/VOR, etc.) it would tell me something about the fix, or special use airspace but it doesn't. The pan only allows the user to move off the map, nothing more. To get out of the "PAN" function, just press the "PAN" "Smart" key again. Instead of pressing buttons to pan out, I wish IIMorrow had installed a small joystick. The joystick would have allowed navigation around the screen to be easier and more precise. The MX20 does show a green reference line back to the center of the current position.
Customizing The Screen
Earlier I mentioned Customizing the screen, let's dive into this subject a
little more. Every pilot is different and wants to see different information on
the screen and wants to change that information at a whim, with the MX20
customizing couldn't be easier. Let's start with choices of "Flight Planning",
 "Map
Orientation, "Invert" "Nav Data, and Terrain. Most of the options are tri-state.
If the option in question is clear, the icon and labels for that option are NOT
displayed. When the option is solid in color, both the icon and label are shown
on the screen. When the option is partially filled, only the icons are shown.
The maps in the GX series GPS's operate the same. This allows for an easy and
fast way to declutter the screen.
"Map
Orientation, "Invert" "Nav Data, and Terrain. Most of the options are tri-state.
If the option in question is clear, the icon and labels for that option are NOT
displayed. When the option is solid in color, both the icon and label are shown
on the screen. When the option is partially filled, only the icons are shown.
The maps in the GX series GPS's operate the same. This allows for an easy and
fast way to declutter the screen.
The "Flight Plan" option controls the display of the Flight Plan course line. In other words you can turn on/off the Flight Plan course line in seconds. I found it was very helpful when turned on. The Flight Plan line is magenta in color. By the way, the flight plan is initiated in the GPS, not in the MX20. The MX20 displays only the flight plan that is active in the connected GPS.
The MX20 has more Map Orientation screens than I have house payments. Every pilot has his/her on way of viewing information. Personally, I prefer "Track Up", which means I'm always flying toward the top of the screen. I found it confusing flying side ways across the screen BUT with the MX20 you can fly anyway you desire. The screen can be set to "North Up" and that means just what it says. As one would expect, we are referring to magnetic north up. "Track Up ARC" is another great mode. In this mode, "Track" is always up but a 120 degree ARC is displayed on the upper part of the screen. I found during my short flight this mode was good one to use. There is also a "Track Up 360 ARC" which is basically the same as above but with a 360 compass card. "Desired Track Up" sets the desired track to the next waypoint at the top of the screen. Experiment and see which Map Orientation is best for you.
The "Invert" mode changes the display of text and background color. This will depend on which layers are turned on; inverting the display may help readability of the current lighting conditions. I found inverting the lighting at night really aided in reading the screen, especially in the IFR Map mode. The white background is just too bright at night unless you turn the map backlighting low. By "Inverting" the display, the background wasn't so bright and the airways showed up better. Again, the MX20 display is for every pilot. If you don't like what you see, just change it.
"Nav Data" allows the pilot to place on the screen the Nav Data they desire. By pressing the "Line Select" key the pilot can select no nav data, nav data only in the corners or full nav data. The full nav data places information in all four corners of the MX20. The top left corner will display the Waypoint you are going to along with the identifier and a pictorial of the runway layout. The bottom left shows the range you have selected for the screen, altitude, and Baro setting. The top right of the screen displays Bearing to the next Waypoint. The bottom right of the screen displays Track angle, Ground Speed, and Distance to the next Waypoint. I had all the Nav Data displayed on my MX20 most of the time. With the MX20's massive display, you still have plenty of viewing area left. The "Terrain option allows the pilot to select the display of topographical features. Toggling the "Terrain" key toggles the map between sectional (absolute, terrain awareness (relative) or you can turn this feature off. The absolute display shows a display similar to a sectional map. If the terrain data is missing, the missing area will be displayed as a light blue.
Now let's customize our fixes on the screen. You can easily select airports, VORs, NDBs, intersections. These are Tri-State functions as mentioned above. You can have the fix on with icon and identifier, icon only or totally remove the fix from the screen. This is a big plus when trying to declutter the screen. In some areas, intersections fill up the screen but with the MX20 you can remove the intersections or whatever in seconds. Airspace customization is really nice. By pressing the "Line Select key located next to the Airspace allows the pilot to turn on special use airspace and altitude information, boundaries alone, display none of the above.
Low and/or High Airways can be selected and displayed on the "IFR"
screen. You can remove the Airway Label if you desire. Just how good is
the IFR screen? Spread your Jepps enroute chart out on a table.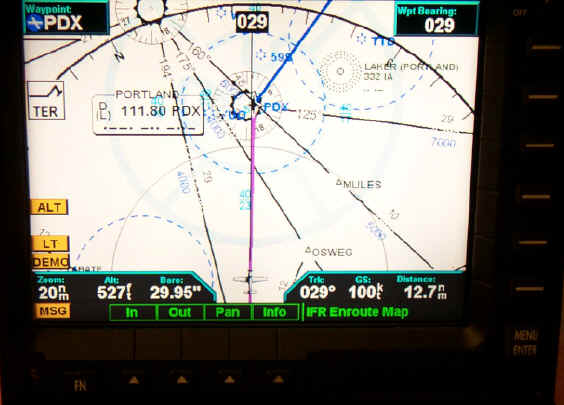 The MX20 looks just like the Jepps chart with one exception.
There's no wrinkles or creases. You would have to see it to believe it One can
also have the MX20 display bodies of water should you desire.
The MX20 looks just like the Jepps chart with one exception.
There's no wrinkles or creases. You would have to see it to believe it One can
also have the MX20 display bodies of water should you desire.
The "Roads" option allows the user to turn on interstates and state highways. I found in real use, the roads were not as pronounced as some of the portable GPS units or units such as the Garmin 430. None of the roads on the MX20 show a label at all, you have no idea what highway is below you. But thinking about it, do VFR charts show highway numbers? During my three weeks writing this article and flying with the MX20, I found the road feature wasn't very helpful due to the small size and no label. The "Boundary" option allows the user to select state boundaries and USA borders.
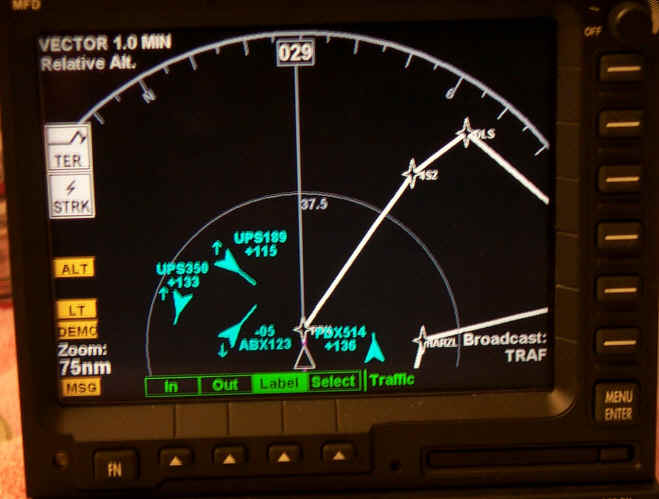
As you are reading the operator's manual you may pine for the "Traffic Function" that is mentioned in the book. The FAA in Alaska is evaluating that system at the present. It is not available for sale at this time. IIMorrow has plans to interface the Ryan and BFG TCADSs with the MX20. Expect this in the future. Remember, this is a multi function box capable of almost anything with the correct sensors.
The "Lightning Menu" lets the user set up the display page. You have the choice of 120 or 360 degree viewing angle. The WX500 detects the electrical discharge with its range and displays the discharge locations on the MX20 via red "x"s. You can select either single strike or groups of lightning representations.
As with most avionics that I "Review" the MX20 had to be test
flown. I wondered just how much jump the big MX20 would have when the
aircraft turned and what it would be like to watch the terrain change colors as
the aircraft climbed and descended. Even though the MX20 had ample brightness on
the bench I wondered if the display would be bright enough in a cockpit. Now a
big problem, I wasn't installing the MX20, so what is one to do? At this point I
strapped a GX50 GPS, the MX20 and a SL 70 transponder and ACK-30 encoder
together and placed them on the co-pilots seat. The SL 70 transponder was needed
to convert Gray Code supplied by the ACK-30 encoder to RS-232 needed for terrain
data within the MX20. Yes, it was a "kluge" at best and by the time I had all
this wired, the cockpit of the Piper Lance looked like a spaghetti factory. I
wired into the cigar lighter to get power for all the boxes. The GPS antenna was
placed on the glare shield and worked fine there. I considered this
"arrangement" portable, thus no FAA documentation was needed. Finally, I got
everything working as once and took toward the sky. As only my luck would have
it, the encoder I was using rolled over dead, so back to the airport for
another. Again, up we go and this time everything seemed to work fine. The MX20s
moving map didn't have a lot of jerk as I made heading changes unless I made
hard turns. The jerk was acceptable especially considering there is no heading
system for reference. The color display was excellent in the cockpit. I went to
manual dim and turned the display up to full (which was way too bright) but my
plan was to get direct sun light on the display and see what happened. Finally,
I got the big Piper positioned so the sunlight was directly on the MX20. I could
easily read the big MX20 display when the screen setting was not inverted. . I
don't care what the lighting condition was; the MX20 display was always there as
bright as ever. The big 6" diagonal screen made it easy to read even when in the
copilots seat. 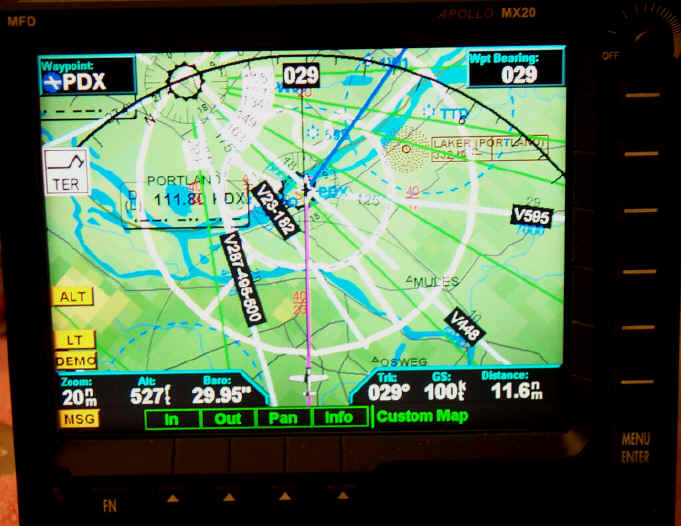 The terrain function was fantastic. I descended below the large
hills in my area and sure enough, the terrain showed red. Yes, I did set in the
correct "Bero" setting. As I made the Piper climb the same terrain changed to
yellow at 600AGL. Imagine, if this feature saved your life two or three times,
it would be worth the cost…I highly recommend connecting the terrain feature if
you purchase a MX20. When the display turned red, it really got my attention,
even though it was VFR and I knew where I was. Imagine how handy the terrain
feature would be late at night; you're tired and arriving at an unfamiliar
airport. I flew with the MX20 for over an hour and loved it better by the
minute. At night, the display was prettier than a Vegas stage show.
Unfortunately, I had to return the borrowed aircraft and remove the equipment
from the seat.
The terrain function was fantastic. I descended below the large
hills in my area and sure enough, the terrain showed red. Yes, I did set in the
correct "Bero" setting. As I made the Piper climb the same terrain changed to
yellow at 600AGL. Imagine, if this feature saved your life two or three times,
it would be worth the cost…I highly recommend connecting the terrain feature if
you purchase a MX20. When the display turned red, it really got my attention,
even though it was VFR and I knew where I was. Imagine how handy the terrain
feature would be late at night; you're tired and arriving at an unfamiliar
airport. I flew with the MX20 for over an hour and loved it better by the
minute. At night, the display was prettier than a Vegas stage show.
Unfortunately, I had to return the borrowed aircraft and remove the equipment
from the seat.
Is there anything I'd do different If I were the "Big Wig" at IIMorrow? Sure. I noticed the control buttons are not lighted at night, I'd find some way to get some light on those switches, not a biggie but for $6,995.00 I would expect it. I'd install a joystick to be used during the "PAN" function and allow the software to describe the area where the PAN stops such as an airport or special use airspace. Others do it so can IIMorrow. How about a GPS receiver inside the GX20? There's plenty of room, take a look at the pictures. Some aircraft do not have enough panel space for a 5" tall MFD AND a panel mounted GPS. Outside of these few picky items it's an excellent box and Avionics West will sell the heck out of them.
There's a "RAT" among IIMorrow's Ranks (no it's not Wayne McGee). While getting some information from IIMorrow about the MX20 I stumbled upon a person that told me the direction IIMorrow was heading with the splendid box. They told me way more than there were allowed to. Their concern was they be dismissed if the boss found out all the inside scoop I was told. Not a problem was my response; I'll hire you in a second. There are some major plans for the MX20 in the future. First off, is software to fix the "Panning" problem I found researching my article. Expect soon to see the SL30 to interface with the MX20. What will it do exactly? I promised not to tell but it's out of this world! How about cheap TCAD inputs, real-time radar, sat-com and more? Well, you might just see these in the near future. No doubt the MX20 will continue to evolve as time goes. After all, it's a Multi-Function Display and the architecture is there to increase its capability. Should one wait to purchase the MX20 when more features are available? I wouldn't. Why not enjoy this amazing box now. When upgrades do come along (and they will), it will be just a software upgrade, NOT a new box. We've seen this type of technology in other products in the past five years. Just upgrade the software and now the box has all the nice, new features.
My "Review" is probably more confusing than actually operating the MX20. There's nothing you can't make the MX20 do within 15 seconds of use. Sure they are other MFD's on the market today. Some cost more and some cost less then the MX20. None within it's price range that I've experimented with meet the quality and performance of the MX20. IIMorrow hit a home run with this box.